Vagrant is a powerful tool for managing virtual machines, and it can be incredibly useful for developers, sysadmins, and other power users. In this guide, we’ll walk you through the process of installing Vagrant on Windows 11 and show you some practical ways to put it to use.
Prerequisites
Hypervisor: Vagrant uses a hypervisor (Hyper-V, VirtualBox, VMWare) to manage virtual machines, so you’ll need to have this installed first. I’d recommend installing Hyper-V on a Windows machine, because that’s more compatible. The positive side of VirtualBox and VMWare is that you’ll have more VM (Box) options to download from https://app.vagrantup.com/
Installing Hyper-V
- Open the Settings app by pressing the Windows key + I.
- Click on “Apps.”
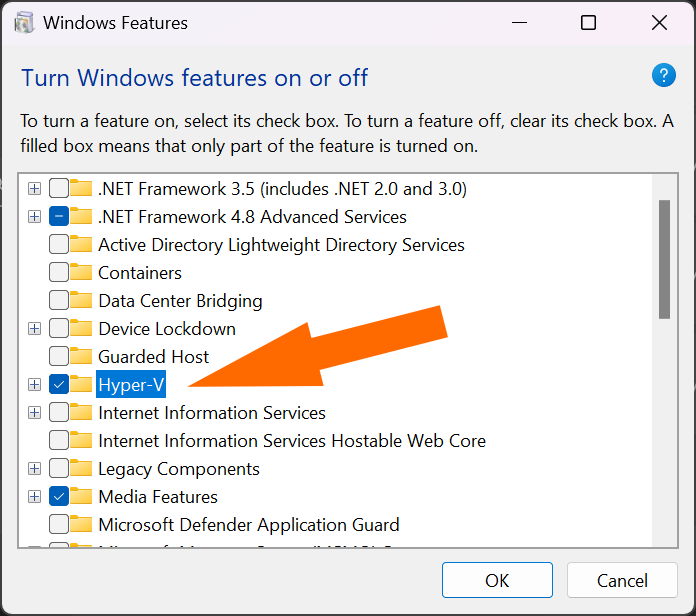
- Click on “Optional features”
- At the bottom click on “More Windows features”
- Check the box next to “Hyper-V.”
- Click on “OK” to install Hyper-V. This may take a few minutes to complete.
- Restart your computer when prompted.
- Once your computer has restarted, you can continue with the installation of Vagrant.

Alternatively, you can use the PowerShell to install Hyper-V by running the following command:
Enable-WindowsOptionalFeature -Online -FeatureName Microsoft-Hyper-V -All
Please note that in order to use Hyper-V, your computer must meet the system requirements and have the Hyper-V feature enabled in the BIOS. If you’ve Windows 11 Home edition, then you can still install Hyper-V for free.
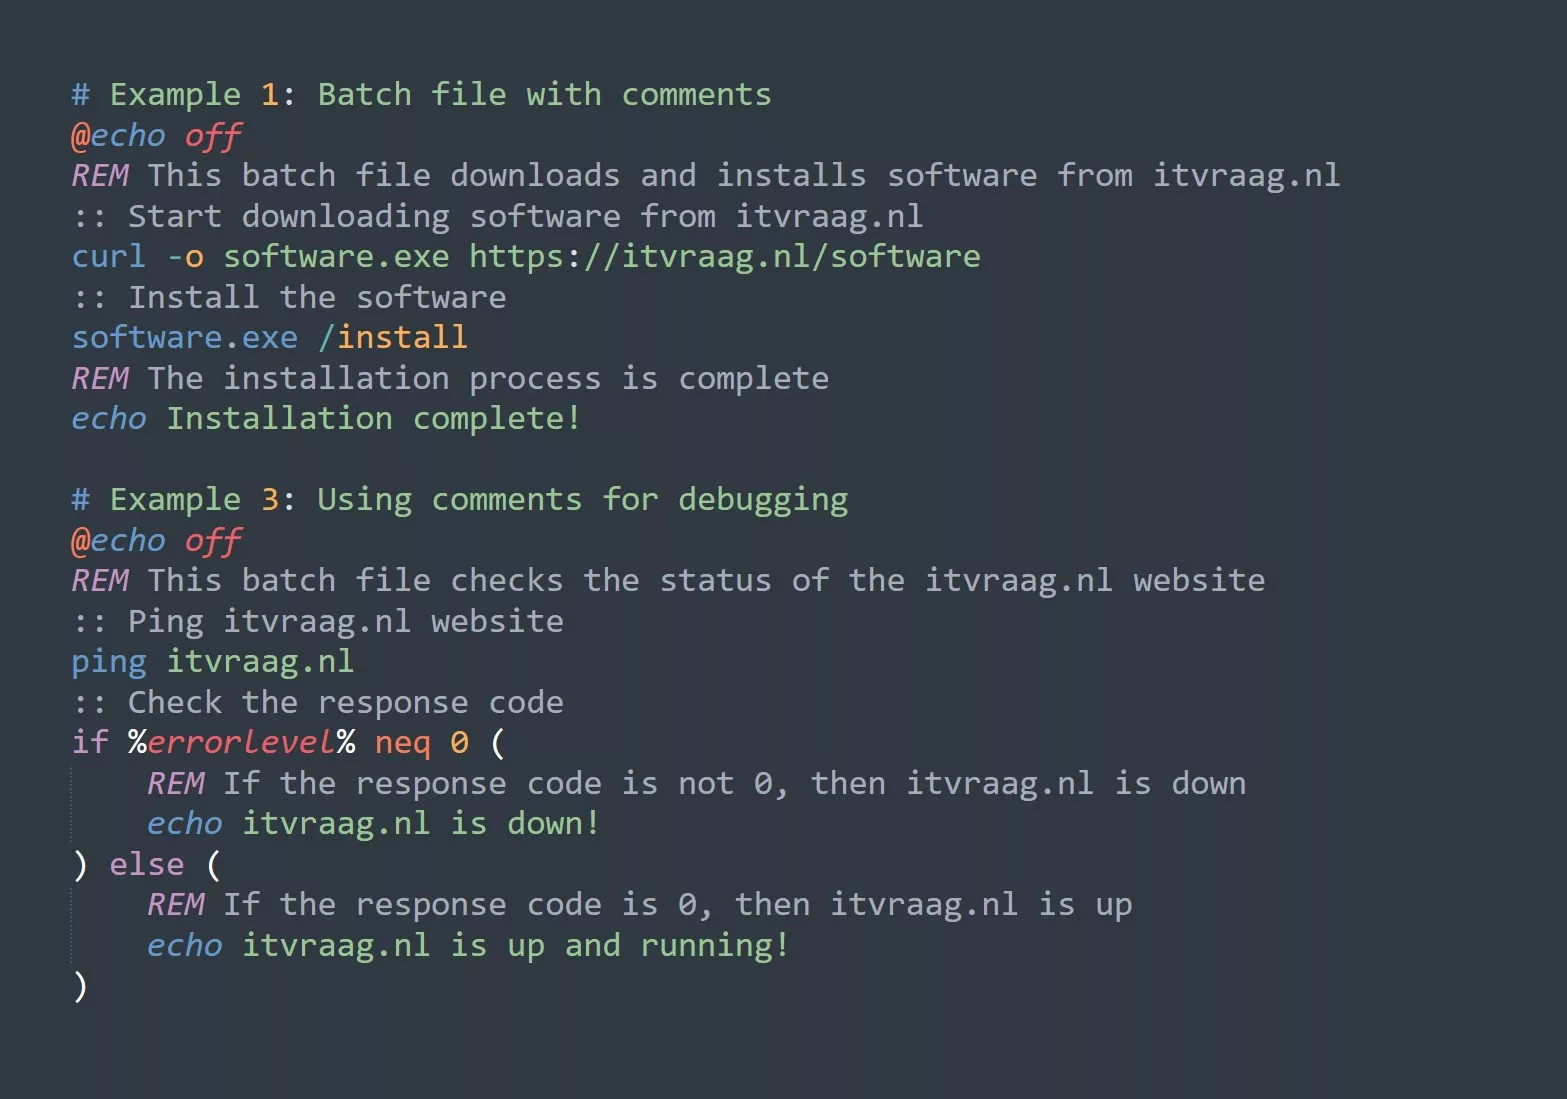
Hyper-V on Windows 11 Home edition
Create a BAT-file and copy paste the following lines in it:
pushd "%~dp0"
dir /b %SystemRoot%\\servicing\\Packages\\*Hyper-V*.mum >hyperv.txt
for /f %%i in ('findstr /i . hyperv.txt 2^>nul') do dism /online /norestart /add-package:"%SystemRoot%\\servicing\\Packages\\%%i"
del hyperv.txt
Dism /online /enable-feature /featurename:Microsoft-Hyper-V -All /LimitAccess /ALL
pause
Save the file and then run it as Administrator by right clicking on it and choosing “Run as Administrator”.
When the script is done, you’ll be asked to restart your computer.
Installing Vagrant
Once you have Hyper-V installed, you can go ahead and install Vagrant. The easiest way to do this is to download the installer from the Vagrant website and run it: Install | Vagrant | HashiCorp Developer
Once the installer has finished, you should be able to open a command prompt and type vagrant to see the available commands.
Setting up a Vagrant environment
Now that you have Vagrant installed, you can start using it to create and manage virtual machines. Here’s an example of how you might set up a simple Vagrant environment:
- Open a command prompt and navigate to the directory where you want to create your Vagrant environment. Make sure to run your
vagrantcommands always from the same directory as you initiated. - Run the command
vagrant init. This will create a new Vagrantfile in your current directory. - Open the Vagrantfile in a text editor and configure it to use the virtual machine image you want to use. For example, you might use the following line to use Ubuntu 20.10:
config.vm.box = "generic/ubuntu2010" - Run the command
vagrant upto start the virtual machine. - Run the command
vagrant sshto log into the virtual machine.
For a list of available Vagrant boxes visit: Discover Vagrant Boxes – Vagrant Cloud (vagrantup.com)
In Vagrant Cloud you can see two ways to initiate your Vagrant Box:
- Creating a new Vagrantfile
- Using
vagrant initcommand


If you want to know more about how to manage Vagrant boxes, read the next blog or other series on the subject.