Download and install ffmpeg
To create a GIF from a video file using Python, you can use the ffmpeg library. ffmpeg is a powerful tool for manipulating video and audio files, and it can be used to create GIFs from video files with high quality and low file size. You can run this on most OS, because Python and ffmpeg run on most of them.
First, you will need to install ffmpeg on your system. You can download the latest version of ffmpeg from the official website (https://www.ffmpeg.org/download.html) and follow the installation instructions. Make sure that ffmpeg is available on the system path so that it can be called from Python.
To download and install ffmpeg on a Windows system and set the environment variables so that it can be used from the command line, you can follow these steps:
- Download
ffmpeg: Go to the officialffmpegwebsite (https://www.ffmpeg.org/download.html) and click on the link for the latest version offfmpegfor Windows. This will download a zip file with theffmpegexecutable and other files. - Unpack the zip file: Extract the contents of the zip file to a location on your computer, such as
C:\ffmpeg. - Set the environment variables:
- Open the Start menu and type “Environment Variables”.
- Click on the “Edit the system environment variables” button.
- In the “System Properties” window, click on the “Environment Variables” button.
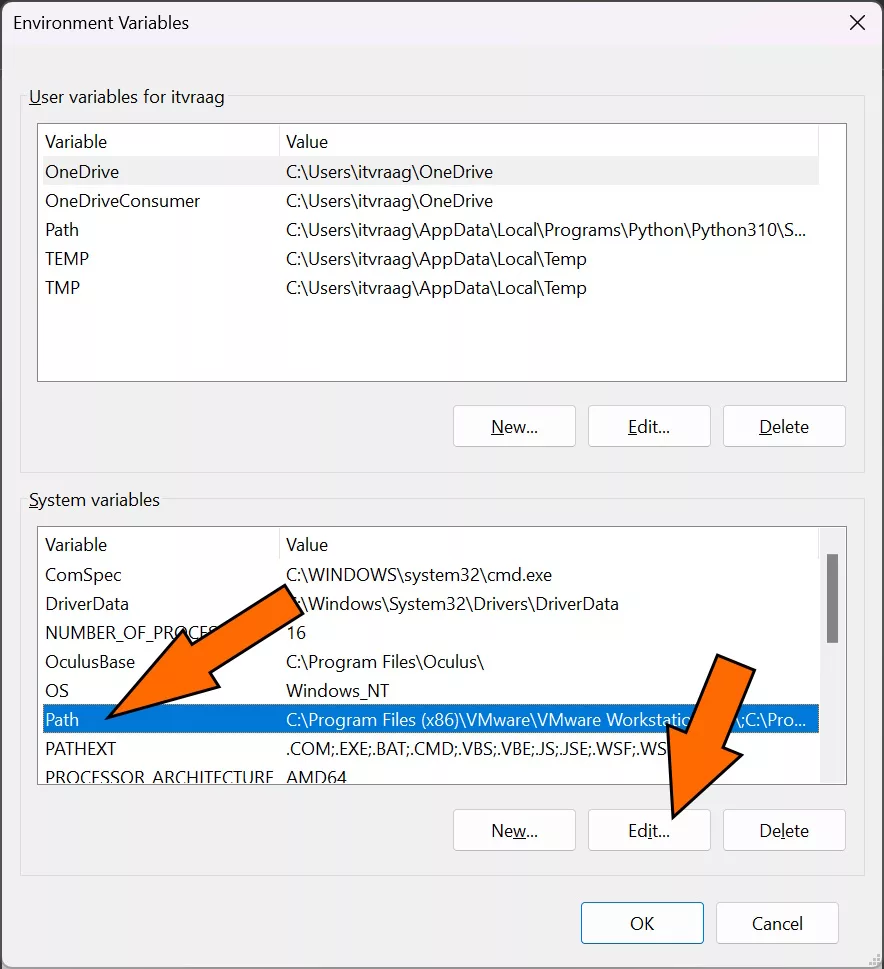
- Under the “System variables” section, scroll down to the “Path” variable and click on the “Edit” button.
- In the “Edit environment variable” window, click on the “New” button and add the path to the
ffmpegexecutable, for exampleC:\ffmpeg\bin. - Click on the “OK” button to close the window.
- Test the installation:
- Open a command prompt and type
ffmpeg. If the installation was successful, you should see theffmpegcommand line help.
- Open a command prompt and type
That’s it! ffmpeg should now be installed and ready to use on your Windows system. You can use it to manipulate video and audio files from the command line or from within your Python scripts.
Installing Python
You will also need to have Python installed on your system. You can download Python from the official website (https://www.python.org/downloads/) and follow the installation instructions.
Python Script
Next, you can use the subprocess module in Python to run ffmpeg commands. To create a GIF from a video file, you will need to create a palette file from the input video and then use the palette file to create the output GIF.
Here is an example of how to create a GIF from a video file using ffmpeg and Python:
import subprocess

# Create a palette file from the input video
subprocess.run(["ffmpeg", "-i", "input.mkv", "-r", "10", "-vf", "fps=10,\
scale=640:-1:flags=lanczos,palettegen", "-y", "palette.png"])

# Create the GIF from the input video and the palette file
subprocess.run(["ffmpeg", "-i", "input.mkv", "-i", "palette.png", "-r", "10", \
"-filter_complex", "fps=10,scale=640:-1:flags=lanczos[x];[x][1:v]paletteuse,\
setpts=1.0*PTS", "-y", "output.gif"])
This code will create a palette file palette.png from the input video input.mkv, with a frame rate of 10 frames per second and a size of 640 pixels wide and proportional height. The scale parameter is used to resize the input video and the flags parameter is used to specify the resampling algorithm used. You can adjust the frame rate and size of the palette file by setting the fps and scale parameters.
Then, the code will create a GIF output.gif from the input video and the palette file, with a frame rate of 10 frames per second and a size of 640 pixels wide and proportional height. The scale parameter is used to resize the input video and the flags parameter is used to specify the resampling algorithm used. You can adjust the frame rate and size of the output GIF by setting the fps and scale parameters.
Using ffmpeg and Python, you can easily create high-quality GIFs from video files with low file sizes. With a little bit of customization, you can create GIFs that are perfectly suited to your needs.
Increase/Decrease Speed
To control the duration of each frame in the output GIF, you can use the setpts filter in the ffmpeg command. For example, to set the frame rate to 20 frames per second and the duration to 0.5 seconds, you can use the following command:
subprocess.run(["ffmpeg", "-i", "input.mkv", "-r", "20", "-vf",\
 "fps=20,scale=640:-1:flags=lanczos,palettegen", "-y", "palette.png"])
subprocess.run(["ffmpeg", "-i", "input.mkv", "-i", "palette.png", "-r", "20", \
"-filter_complex", "fps=20,scale=640:-1:flags=lanczos[x];[x][1:v]paletteuse,\
setpts=0.5*PTS", "-y", "output.gif"])
Running The Script
To run the script, you can use the python command followed by the script name, or you can make the script executable and run it directly.
Here is an example of how to run the script:
python create_gif.py
Or:
chmod +x create_gif.py
./create_gif.py
That’s it! Your script should now be running, creating a palette file and a GIF from the input video file.


